Monday, June 01, 2009

ListView/ListBox Selected Item Color – Active and Out of Focus

The following snippet of XAML can help you set a fixed color scheme for a selected item in the list controls whether the control has focus or not.

   1: <StackPanel Orientation="Vertical">


   2:         <ListView Background="SeaGreen">


   3:           <ListView.Resources>                        


   4:             <SolidColorBrush x:Key="{x:Static SystemColors.HighlightBrushKey}" Color="Red"/>


   5:             <SolidColorBrush x:Key="{x:Static SystemColors.ControlBrushKey}">            


   6:                   Red


   7:             </SolidColorBrush>


   8:             <Style TargetType="{x:Type ListViewItem}">


   9:               <Style.Triggers>


  10:                 <Trigger Property="IsSelected" Value="True">


  11:                   <Setter Property="Foreground" Value="Black"/>


  12:                 </Trigger>


  13:               </Style.Triggers>


  14:             </Style>


  15:           </ListView.Resources>


  16:             <ListViewItem>String 1</ListViewItem>


  17:             <ListViewItem>String 2</ListViewItem>


  18:             <ListViewItem>String 3</ListViewItem>


  19:         </ListView>


  20:         <Button>Button 1</Button>


  21:     </StackPanel>


Declaring Empty String in XAML

Shown below is a code snippet which does not work.

   1: <ListView xmlns:System="clr-namespace:System;assembly=mscorlib">


   2:     <ListView.ItemsSource>


   3:      <coll:ArrayList>


   4:           <System:String></System:String>


   5:           <System:Int32>34</System:Int32>


   6:     </coll:ArrayList>  


   7:     </ListView.ItemsSource>


   8:   </ListView>


One would notice the following error when the above XAML is parsed.


Cannot create object of type “System.String”. CreateInstance failed, which can be caused by not having a public default constructor for ‘System.String’.


The reason for this error is that the “System.String” class does not provide a default constructor and this disallows declaring empty string.


What’s the fix?


   1: <ListView xmlns:System="clr-namespace:System;assembly=mscorlib">


   2:     <ListView.ItemsSource>


   3:      <coll:ArrayList>


   4:             <!-- notice empty string via usage of x:Static -->


   5:           <x:Static Member="System:String.Empty" />          


   6:           <System:Int32>34</System:Int32>


   7:     </coll:ArrayList>  


   8:     </ListView.ItemsSource>


   9:   </ListView>


Hope this helps.

Friday, May 29, 2009

Using WCF + Silverlight 2 + PRISM : Gotchas

In this entry, I would be talking about the issues that I have encountered when developing a Silverlight application structured with PRISM principles and that is driven by a WCF service. Some of the issues that I mention here are applicable even when making just Silverlight applications (like Data Binding Hello World!).

Gotcha 1 : Working with Data Binding

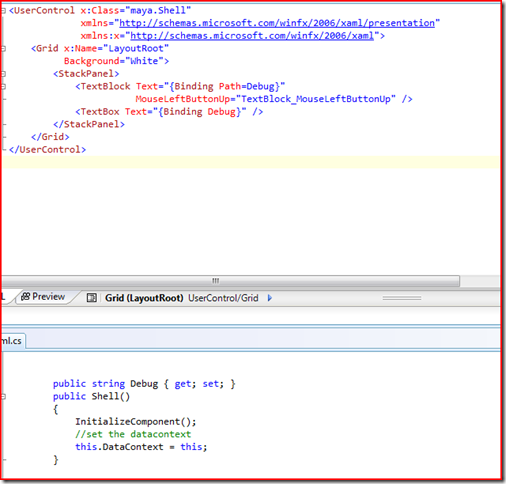
Shown below is the code snippet for startup xaml page – XAML code on the top and code behind at the bottom half.
image

If you observe the XAML, it simply contains a textblock and a textbox which both binds to the same property called “Debug”.

So in the codebehind, I created a property called “Debug” and in the constructor for the page (my page is called Shell), I have set the DataContext to itself. So the Binding Source should be the DataContext of the UserControl which points to itself (the instance of Shell). So Debug property should be taken from the property listed in the Shell class.

While this setup works well in a WPF application, running in Silverlight terminates the application. I have noticed that when “this.DataContext = this” is placed in a Silverlight page, the application would terminate with an exception [AG_E_PARSER_BAD_PROPERTY_VALUE(Line: 8 Position: 42)].

image

Apparently, this.DataContext = this is not being liked by the Silverlight engine. You can comment the XAML inside StackPanel and then try running the application again. You would still notice that the application fails to execute.

So, the lesson learnt here is “unlike in WPF, Silverlight does not like DataContext of a UserControl to be set to itself”.

So how am I going to make it work?

Shown below is the fixed version. We have a  ShellViewModel which is instantiated within the constructor and then the data context is set to this instance.

image

Gotcha 2: Missing Event Handler Methods can terminate your application

Sometimes it so happens that you specify an EventHandler method in XAML but forget to implement the method in code. In that case, the compiler does not throw an error and instead a runtime exception would terminate the application. If you would like to experiment, remove the empty “private void Text….” method inside Shell class and run the application.

Gotcha 3 : Data Binding makes no sense without INotifyPropertyChanged.

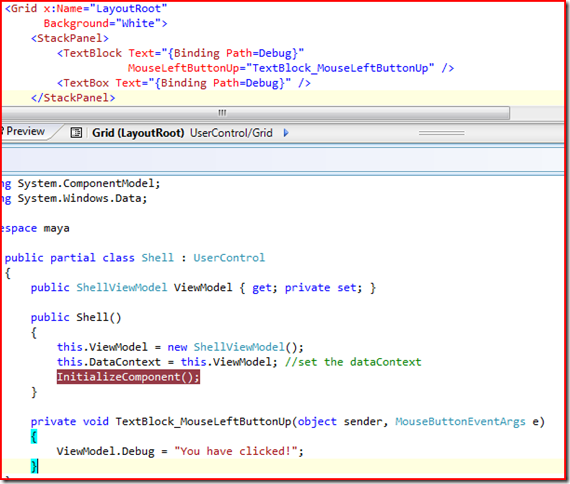
If you look at the last code snippet, in the XAML section, both TextBlock and TextBox bind to the same “Debug” property. Now in the TextBlock LeftMouseButtonUp event handler, lets add a line which changes the value of the “Debug” property, like shown below.
image

Now, if you run the application, and left click on the TextBlock, the event handler would be executed, the value of Debug would be updated but the UI would still show the same “Click Me!” (the default value for Debug) since it has no idea that the Debug property has been modified.

To fix this and to make the UI thread aware of any changes made to the properties it binds to, the properties should either be made as Depdendency Properties or the Data Context should implement INotifyPropertyChanged and the setter of the properties should raise the PropertyChanged event.

Using INotifyPropertyChanged

Shown below is the modified ShellViewModel which implements INofityPropertyChanged.

image

Using INotifyPropertyChanged is probably a better way to do things and in fact much simpler to use. In every property, the setter should raise the PropertyChanged event. Thats it!

Now the application works as expected. When you click on the textblock, both the TextBlock and TextBox changes.

image

Gotcha 4 : Be aware of Data Binding Default Mode.

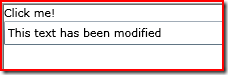
If you come from a WPF background, like me, then the same set up (XAML + code as shown until now) would behave differently in Silverlight. In WPF, if you change the text inside the textbox and tab out, you would notice the text in the text block change as well. But this does not happen in case of Silverlight. Proof ?? Try it or believe what is shown in the picture below.
image

Notice that the text block still shows the old text in spite of the text changed in the textbox (which also binds to the same property as the text block). The reason for this not to work is that in WPF the default Binding Mode is TwoWay, while in Silverlight its OneWay. For those who do not know, TwoWay means changes in the source (data) would also update the target (UI) while OneWay only updates the source when the target is changed by the user (at least that is what I understand they mean).

What’s the fix?

image

image

Silverlight Dependency Properties

Look at this article : http://blogs.sqlxml.org/bryantlikes/archive/2008/12/15/silverlight-dependency-properties.aspx


Now that I have talked about some fundamental issues one might face when starting Silverlight development, I thought I would dig more into gotchas encountered when working with Composite Silverlight applications driven by WCF services.

Gotcha 5: Composite Silverlight Applications – Bootstrapper, ModuleCatalog using XAML

Assumptions : I assume you have downloaded the Composite WPF/Silverlight (PRISM) and built the CAL. Shown below are the Silverlight libraries that I have on my machine. I also assume you have basic understanding of what a composite application is, what silverlight module is, etc.

image

In the Silverlight project, add reference to the above libraries. Then the first step is to create a Bootstrapper. The bootstrapper performs all the required initialization and configuration for the application. Shown below is my Bootstrapper that I have used in one of my silverlight prism applications.

 image

The bootstrapper 1) creates the shell, 2) tells how your modules are cataloged and 3) additionally, it adds new RegionAdapters to existing ones.

The fun part here is the ModulesCatalog.xaml. This XAML file is used to configure my modules and the  contents would be shown in a while. The package uri used is always annoying to me, so I use this URI as a reference and it works. You are free to use this as a reference. Anyway, lets look at the modules catalog.

image

Even though each XAP file has only one module, I noticed that for the Module configuration to work properly for both WhenAvailable/OnDemand, ModuleInfoGroup has to be used.

Before we look into how to make each module as a separate XAP file, lets look at how the bootstrapper has been used.  The App.xaml.cs has to be modified in the Application_Start method to reflect the following.

image

Gotcha 6 : Preparing a Silverlight module as a XAP File

When you create a new Silverlight Library, the output of the project would be a silverlight dll which cannot be used for On Demand loading for PRISM applications. So you have to make your modules to be generated as a XAP files (which are just ZIP files). Follow the steps shown below and you would be good.

1. Add a new Silverlight application project to the solution. Stress on “Silverlight Application” not a Silverlight library.

image

Make sure you link the control but you uncheck “Add a test page that references the application”.

2. Delete the App.xaml file.Build the solution. You should see the .xap file added to the ClientBin along with the shell project. Shown below is my project structure after the build. (Notice ethe maya.sample.module.xap and also missing App.xaml inside the module project).

image

Sub-Gotcha: What if you already have a silverlight library project and you wish the build to generate a XAP file instead?

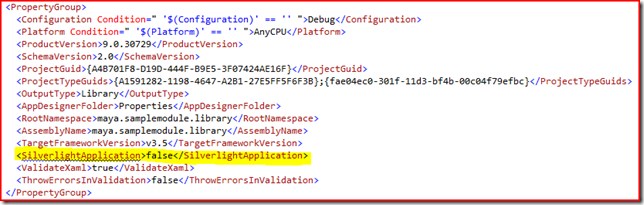
You have to right click on the silverlight library project and “Edit Project file”. This unloads the project and opens the project file inside XML editor within Visual Studio. (Or you can open it manually in editor of your choice). The first PropertyGroup section would like shown below. Notice the SilverlightApplication is set to false.
image

Make changes such that it looks like shown below. You have to add XapOutputs element and set it to true.

image

Now reload the project. Open the project folder in Windows Explorer and go to the Properties folder. Add a new file  called AppManifest.xml with the contents as shown below.

   1: <Deployment xmlns="http://schemas.microsoft.com/client/2007/deployment"


   2:         xmlns:x="http://schemas.microsoft.com/winfx/2006/xaml"


   3: >


   4:     <Deployment.Parts>


   5:     </Deployment.Parts>


   6: </Deployment>


Now come back to Visual Studio and click on the “Show All files” icon in Visual Studio Solution Explorer selecting the library project.


image


You should see AppManifest.xml without any icon associated. Right click on the xml file and click “Include in Project”.


Now go to the properties. The Silverlight tab should look like shown below. Specify the Xap Filename as you wish. Typically, I name it same as the Assembly name.
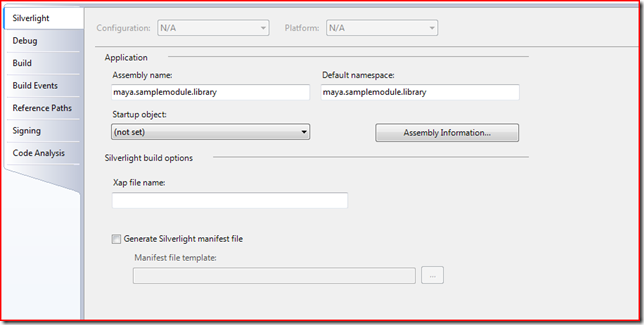


image


My modified Silverlight Build options screen is shown below.


image


Notice that I have also set the Manifest File template to the file that we added previously.


Sub - Gotcha : This generates the XAP file. But it isn’t being copied to the ClientBin


If you build the library project with the changes mentioned above, you can see the XAP file  generated in the Debug folder but it would not automagically sit inside the ClientBin for the Web application project. To make this happen automatically, you have to modify the web application project properties. Right click on the web application project that contains your ClientBin. Go to the Silverlight Applications tab. Click on Add. Select your project and uncheck the “add a test page that references the control” since we do not want that. Shown below is that “Add Silverlight Application” screen. Finally click “Add”.


image


Now build your solution and you should notice the XAP file being copied into the ClientBin folder.


Gotcha 6 : Configuring Modules using XAML – ModuleCatalog : Always place the modules inside ModuleInfoGroup.


Like mentioned previously, modules can be configured via an XAML file. This configuration allows one to specify if the modules be loaded as soon as they are available or when demanded. Lets assume that you have a XAP module which is to be loaded on demand and one which is to be loaded when available. Shown below is segment of my ModulesCatalog.xaml file whose complete version has been presented previously. Somehow, ModuleInfo when placed inside ModuleInfoGroup works where as just a ModuleInfo by itself always seemed not to work (may be I did something wrong).
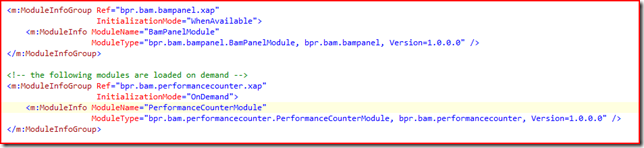


image


So how to demand a module?


_moduleManager.LoadModule("PerformanceCounterModule");


Where _moduleManager refers to the current ModuleManager instance. The best way to get this is to add ModuleManager parameter to the constructor and use UnityContainer to resolve the object. For example, shown below is one of the ViewModels that I use which has an instance of ModuleManager passed to its constructor. The ViewModel is not instantiated directly but instead obtained via “container.Resolve<>()” call.


image


Unless implemented once, these concepts are rather difficult to understand. May be I will do a walkthrough for WPF based Twitter client very soon during which we can look at how it works out. For now, I assume you understand what I am talking about.


Gotcha 7 :  WCF Service with Silverlight Applications – Deployment, Libraries, etc….


First of all, lets say you have a WCF service hosted inside the Web application. Lets say you created a Silverlight library which consumes this service, thereby you get to have a ServiceReferences.ClientConfig inside this helper client library but would not be present inside the shell application. Later when you deploy the service, it would be required that you modify the configuration files since the deployed service might have a different URI than the one at development. So to overcome this, shown below is one way that I often use. This simply obtains the service end point address and it assumes that the silverlight application and the service are both hosted within the same web application. All you need to look at is the way “_remoteAddress” is determined using Application.Current.Host.Source.


image


Now lets look at the application set up. Shown below is the shell project and the helper library which consumes the WCF service. Like I said before the library would be referenced and the WCF service is used instead of consuming the WCF service directly. (highlighted in the picture).


image


So if you try and consume the service within the shell application you would compile and build without any issues. The namespaces would be figured out nicely (or use Ctrl + . in Visual Studio to resolve the namespace). But as you execute the application, you would face the exception shown below.
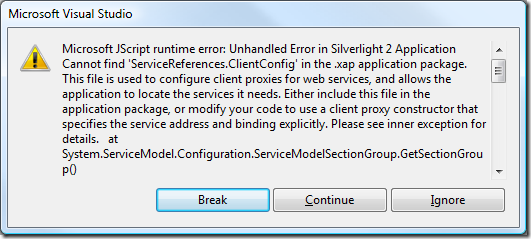


image


The message says “Cannot find ‘ServiceReferences.ClientConfig’ in the .xap application package”. And clearly we did not place one. But if we place one in here, it might be redundant and may later cause conflict issues which is not so easy to identify (since we might forget – remember DRY).


To resolve this, on the shell application (named maya in my case),


1. Right click on the project and click “Add Existing Item”. Navigate to the library which has the actual ClientConfig file.


2. Select the file (ServiceReferences.ClientConfig) and then instead of clicking add, click the arrow next to “add” and click “Add as Link”.


3. Remember we are adding a link. One mistake that I often do is to first click “Add as Link” and then select the file followed by clicking on "Add” button. I assumed the drop down whenever clicked would change the behavior of the “Add” button but this isn’t the case. You have to first select the file and then click on “Add as Link”.


image


4. You can verify that its a linked copy by opening the shell application folder and you should not see any ClientConfig file. It should only be in the service layer library we added.


image


Gotcha 8 : Last one … Silverlight XAP File size, Performance settings.


1. Not sure if it matters much but you can actually extract the XAP file and re-zip it with a better utility like WinRar or 7-Zip and gain much smaller sized XAP files.


2. In the ASPX page that hosts the Silverlight content, you can add an attribute “MaxFrameRate” and set it to a lower value like 10. I have to be honest that I do not know if this setting would improve performance for any kind of silverlight applications or just the ones with media in it. Anyway I do it for any application I use.


I hope this post is informative enough and slightly well organized. I am not an expert in any of the technologies – composite silverlight apps, wcf or even Visual Studio. But i thought it would be a nice thing to share my observations with the community. So please be gentle if there is a mistake in my approach or my concepts and I would be glad to rectify them.


Thank you.

Wednesday, May 27, 2009

Running KirbyBase on IronPython

As I was looking for embedded database systems, I came across this pure python database called KirbyBase. So I decided that I would make it run on IronPython. So this post describes on how to make KirbyBase run on IronPython and using ipy.exe. Note that I am not looking at integrating this database into C# application yet. [may be in the future post]

So what are the steps?

1. Get the latest IronPython and install it on your machine. You should be seeing ipy.exe in the installation directory.

2. Get the KirbyBase download from its website.

3. Download and install Python 2.6 whose libraries are required to run the database tests.

4. Once Kirbybase and Python 2.6 are installed, look for kbtest.py inside kirbybase installation directory.

5. Copy the kbtest.py into the directory which has ipy.exe (the IronPython installation directory).

6. Modify the kbtest.py to include the Python and KirbyBase directories into the path. The final result should look something like shown below.

image

Notice that I have moved “import sys” statement ahead of “import os”. The lines 2 and 3 adds the directories for Python2.6 and KirbyBase to the path.

Then from command prompt type in the following

ipy kbtest.py

The result should look like shown below.

image

May be next time, I would like to see what it takes to integrate this database into C# application. Until then, have a nice time. Let me know if you have better approaches than what I did here. Thank you.

Tuesday, May 26, 2009

Debugging W3WP with “Attach to Process”

When trying to load SOS.dll while the debugger is attached to the w3wp process, if you encounter the following message.

SOS not available while Managed only debugging.  To load SOS, enable unmanaged debugging in your project properties.

Then, stop the debugging session and in the “attach to process” dialog, select your process and click on the “select” button. Then you can pick what kind of debugging sessions would you like to permit.

image

By default, the code to debug is automatically determined in which case only Managed and T-SQL debugging is enabled.

Another useful feature would be using “New Breakpoint” functionality. This would be useful when you are using  Attach to Process and do not have the source code opened as a project. In this case, you can go to Debug->New Breakpoint-> Break at function.

image

Once you are in this window, give the function name where you want to break and then click OK. Ignore any warning messages that it gives and then it would hit the breakpoint if the function you named would be executed. I will be posting more as I learn more about using SOS.dll with W3WP.

Wednesday, May 20, 2009

Using Blueprint CSS in ASP.NET MVC

I know my previous post on the blog is incomplete but I promise to get back to that complete as soon as possible. In the meantime, here is a quick info on how to include Blueprint CSS files within ASP.NET MVC applications. I add this to my Site.Master page.

   1: <link href="<%=Url.Content("~/Content/Site.css") %>" rel="stylesheet" type="text/css" />


   2:     <!-- Framework CSS -->


   3:     <link rel="stylesheet" href="<%= Url.Content("~/Content/blueprint/screen.css")%>"


   4:         type="text/css" media="screen, projection">


   5:     <link rel="stylesheet" href="<%= Url.Content("~/Content/blueprint/print.css")%>"


   6:         type="text/css" media="print">


   7:     <%="<!--[if IE]>"%>


   8:     <link rel="stylesheet" href="<%= Url.Content("~/Content/blueprint/ie.css")%>" type="text/css"


   9:         media="screen, projection">


  10:     <%="<![endif]—>"%>


More later..

Thursday, May 14, 2009

Working with Blueprint CSS Framework!

It has been a long time since I wrote something on my blog. I have been extremely busy as well as lazy to make any updates up here. The last time I talked about detecting prime numbers using python list comprehensions and made a failed attempt to optimize it. I could not find time to work on that again, so I skipped it. Anyway, from then I made significant progress in upgrading my silverlight/wpf/PRISM skills. [More on that sometime later] And then I decided that I would be working on some ASP.NET MVC project which I hope to bring online by the end of June.

As a part of that, I have been looking at evaulating CSS Frameworks – some think CSS frameworks suck, but used appropriately they do save us a lot of time. Every one who is moderately versed with CSS begins to say that using a framework is not a good idea and they miss the point of CSS. Come on, seriously, I looked at two popular CSS frameworks – Blueprint CSS and 960.gs and they are extremely cool. Before I go into any more details on how to use Blueprint CSS, I would like to point out that 960.gs is pretty good and there is a screencast on nettuts.com. If you watch the screencast, it would help you understand the basic concepts which I would not talking about in this post. So please watch the screencast if possible or I assume what ever I write makes sense to you.

Shown below is what we would be trying to achieve. It is very simple to do, once you have the basic understanding of blueprint CSS Framework.

image

DISCLAIMER: Neither I am an author of Blueprint CSS Framework or any of its plug-ins nor am I am any kind of expert in web design. I just know how to survive as a web developer/designer.

My application setup is as follows. I have the blueprint download from their website(http://blueprintcss.org). Once your extract the archive that you have downloaded, you can pick the "blueprint" folder and copy into your website folder. Then in the website, within the same folder where you copied the blueprint folder, create a sample.html.

Firstly, add the links to the CSS stylesheets.
<!-- Blueprint CSS -->
    <link rel="stylesheet" href="blueprint/screen.css" type="text/css" media="screen, projection">
    <link rel="stylesheet" href="blueprint/print.css" type="text/css" media="print" />
    <!--conditional CSS makes the site slightly slower -->
    <!--[if IE]>
        <link   rel="stylesheet"
                href="blueprint/ie.css"
                type="text/css" media="screen, projection">
    <![endif]-->
<!-- End of Blueprint CSS -->
I hope you know that CSS links are added in the <head> section.

CSS frameworks does not give you everything you want and does not prevent you from customizing your html, just like you did when not using the frameworks. The biggest advantage that I see when using the framework is the amount of time you have invest in resetting the browser settings and then time required to test each and every change on your layout. Trust me, it is painful.
Anyway we would stil

Wednesday, April 22, 2009

Detect Prime numbers in one line – Python Code

The following code can be used to print all the prime numbers in a given range. With my recent obsession with Python, I learnt to admire the compactness of the code and all it takes to list the primes is just one line of code!
   1: inp = int(raw_input('Enter the outer bound : '))


   2: l = range(1,inp)


   3: #factors = [i for i in range(2,item/2+1) if item % i == 0]


   4: primes = [item for item in l if item>1 and len([i for i in range(2,item/2+1) if item % i == 0])==0]


   5: print primes


The code could further be optimized to improve the performance drastically.


   1: primes=[item for item in l if item>1 and len([i for i in range(2,8) if item%i==0])==0]


Notice that I am using list comprehensions and in the inner list comprehension inside the len() I am limiting the range of divisors to 8. Obviously any number greater than 8 would be divisible by one of the numbers between 2 and 8 (if it is a composite number).


The above optimized version is fast – so fast that to compute the list of primes between 1 and 50000, it just takes at most a second (did not time it actually) whereas the first one takes forever (i completed typing the whole paragraph and it is still running!). So I verified it with a range from 1 to 5000 and the first one is almost instantaneous.


But! there is a bug in the second algorithm that i listed. It does not verify those numbers that are divisible by other prime numbers which are not between 2 and 8. So any ideas to optimize this? 


Basic algorithm: return all items in a list whose length of the factors list is 0.


Where is the place for optimization?


Computing the factors! is the key here. The faster you compute your factors, the better your algorithm would perform.


More on this later.

Sunday, April 05, 2009

Exploring Embedded Databases for using in ASP.NET

Recently, from the past couple of days I have been obsessed with finding an embedded database that supports concurrent read/write operations and which is easy to deploy. The following are the ones that I have come across and as we see, I share my personal opinion on what issues I think I might face if i ever have to use it in a ASP.NET application which might potentially have multiple users performing read/write on the database. Let me start with the ones I would not be using

SQL Server compact edition

I have seen mixed reviews about this database. I found Ayende personally moved to SSCE from SQLite as his choice of embedded database and he is having some issues. If he is unable to resolve this, I dont think I will ever be able to.

Moreover, the licensing of SSCE is intriguing though it says FREE. I personally did not get a nice feel about it.

The benefits : use entity framework, LINQ2SQL straight off the box from Visual Studio 2008.

Personal Verdict? Don’t care.

Firebird SQL

Some say, its good and some does not think so. Anyway the issue I have with this one is that one needs to go through a lot of workarounds to make it work with ASP.NET application and they say “try not to use this one in ASP.NET application”. Seriously – I believe 8 out of 10 applications people try to make are web applications and is intended to have multiple read/writes so they expect the database to have workaround the Reader/Writer scenario. Moreover, I decided I will stick to using NHibernate + FluentNHibernate as my DAL which makes me not feel good about using Firebird. I love FluentNHibernate and always disliked configurations using XML. I think, if something changes in your system then why not recompile your system and test it. Is it so hard?

Benefits? FirebirdSQL supposedly provides what SQLite cannot – better concurrency and “no file based locking”.

Issues? Oh! Lot many. First of all, there is a DDEX which they claim to work (did not work for me after spending two hours and yeah this has been the only thing I could not get to work in the past few months - but the documentation sucks big time). No one has ever bothered to write about using Firebird with C# applications (from what I searched) and those who have written did not do a great job, given the lack of proper official documentation.  Another issue is that the work somehow is progressing very slow and this made me think that future releases are way too far to see any of my issues to be fixed. Moreover, FluentNHibernate does not support Firebird straight off the box. I need to write hibernate.cfg.xml and pass it on to the Configure() method which I don’t think I would want to do.

Personal Verdict? Don’t care.

ScimoreDB

Sounds scary to be used in an application that I plan to support for a long time. The documentation was decent but I don’t think it is that popular with the NHibernate folks out there. And being a lazy person that I am, I do not want to spend time mapping entities with tables.

Benefits? Not entirely clear about what to write – but the few folks who used it says its fast. Havent bothered trying it.

Issues? No ORM tutorial!! :)

VistaDB – commercial, so forget about it. Anyway, they say it is very good if you are willing to pay for it. If it was free, then I might have spent time to write my own mini ORM for this one (if there wasnt NHibernate support)

EasyDB – they had a dnrTV session but the site disappeared –> Another reason why i think everyone in the blogging community is smarter than me. Stick to SQLite!!

Now the bigger part of the blog – using SQLite in ASP.NET scenario.

Working with SQLite in ASP.NET environment.

Now, for those who are here looking for an answer to SQLite issue with file-level locking, you might be disappointed. Anyway, I did play with SQLite with NHibernate (ofcourse used FluentNH). It looks good for my sample tests and haven’t seen any major issues yet – because I haven’t written anything complex yet.

Issues? Folks says there is no support for concurrent read/write situations since the locks are implemented on file-level instead of table-level. So a writer is blocked out if there are any readers and readers are blocked out if there is a writer. But i hope to find some answer. I saw this page on the SQLite documentation which I plan to test out pretty soon. As of now, I have no idea on how to make it work from NHibernate using System.Data.SQLite.

Benefits? This is by far the most widely accepted embedded database that I have seen during my research and I personally like the support for .NET in the form of excellent .NET providers that Robert has come up with.

What else? I came across others like SharpHSQL (project looks dead), one from IBM and few other paid ones – I don’t want to pay at this moment.

What next?

I have had some questions whose answers I wish to find out either looking or trying. Once I have them, I would post them very soon. Also I would like to post a simple Database Interface wrapper using Fluent NHibernate which I used in my sample applications. The following is the road map for what I will be doing next. There might a couple of posts about them here.

1. One of the discussions on SQLite forums suggested that we serialize all read/write operations to a single thread. I need to figure out doing this on ASP.NET applications where having a background thread is not a good idea since the application pool is recycled killing all my threads.

2. If the above option does not work, then I have to play with the Shared Cache mode.

3. Tweaking and squeezing the best out of NHibernate for concurrent usages.

4. What is the best way to have NHibernate sessions in an ASP.NET application. Right now, I create a session as soon as a new ASP.NET session starts and flush it when the session ends. Theoretically it should be a good choice, but I need to dig more into it.

If you have found out anything more interesting than what I wrote here, please feel free to leave me a comment.

Anyway my final choice of free/embeddable database for my ASP.NET application would be SQLite. I would somehow figure out a way to allow concurrent read/write operations and will post here if i figure out something.

Thursday, March 26, 2009

Creating icons in InkScape

Because of my recent obsession to update my skills on Design (I think I am a decent programmer and with the design skills on my resume, it would be nice!), I created my first icon using Inkscape.

icon.bmp

Ok – this isnt anyway close to the normal most stupid looking icons but hey I have an excuse – I am not a designer.

Anyway, as you work on Inkscape and try exporting your work as icon, I could not notice any export format as .ico. So here is what i did. I exported my work as a PNG (File->Export as Bitmap..) and then using http://www.convertico.com/ I converted my PNG  to an icon!

For tutorial on working with inkscape

http://screencasters.heathenx.org/episode-055/

change episode-055 from episode-001 onwards.

:)

Monday, March 23, 2009

Visual Studio Team Explorer: Going online!

Sometimes, it so happens that the source controlled project no longer shows its bindings to the source control and if you wish to get back the bindings, it is simple.

In the solution explorer, right click on the solution and click “Go Online”. then you can resume your normal work!

Tuesday, March 17, 2009

Some helper methods … extension methods …

In this post, I would like to document a couple of classes with several methods that are useful to convert from one type of data to another. For example, some of the methods can be used to convert a Dataset into JSON string and vice versa.

SQL Query output as XML

The first class to start with the most simplest one. This class can be used to wrap your SQL queries for Sql Server or Oracle such that they return XML output instead of rows. Strategy pattern has been used to implement these methods – nothing fancy.

The base class for query wrapper.

   1: public abstract class QueryWrapper


   2: {


   3:     public abstract string ForXmlOutput(string query);


   4: }


Then one wrapper each for Sql and Oracle has been implemented as shown.


   1: public class SqlQueryWrapper : QueryWrapper


   2: {


   3:     public override string ForXmlOutput(string query)


   4:     {


   5:         return (string.Format("{0} FOR XML RAW;", query)).Trim();


   6:     }


   7: }


   8:  


   9: public class OracleQueryWrapper : QueryWrapper


  10: {


  11:     public override string ForXmlOutput(string query)


  12:     {


  13:         return string.Format("SELECT DBMS_XMLGEN.getXML(\"{0}\",0) from dual;", query);


  14:     }


  15: }


And then there is services class that uses strategy pattern.


   1: public class WrapperServices


   2: {


   3:     private QueryWrapper _wrapper;


   4:     public WrapperServices(QueryWrapper wrapper)


   5:     {


   6:         this._wrapper = wrapper;


   7:     }


   8:  


   9:     public string WrapQueryForXml(string query)


  10:     {


  11:         return _wrapper.ForXmlOutput(query);


  12:     }


  13: }


Conversion classes


The following class provides methods for conversion between


1. XML to JSON


2. JSON to XML


3. Object to JSON


4. JSON to Object


5. Dataset to JSON


6. JSON to Dataset


7. XDocument to XmlDocument


8. XmlDocument to XDocument


9. Some dummy conversions to size In MB, time in seconds which might not be of much interest to you all.


For JSON methods, you would require a reference to JSON.NET libraries.


   1: public static class ConversionHelpers


   2:     {


   3:         #region Xml-X Document Conversions


   4:         /// <summary>


   5:         /// Converts XmlNode into an XDocument.


   6:         /// </summary>


   7:         /// <param name="doc">The XMLDocument to be converted</param>


   8:         /// <returns>The XDocument generated</returns>


   9:         public static XDocument AsXDocument(this XmlNode doc)


  10:         {


  11:             return XDocument.Load(new XmlNodeReader(doc));


  12:         }


  13:  


  14:         /// <summary>


  15:         /// converts the XNode into XmlDocument


  16:         /// </summary>


  17:         /// <param name="xdoc">The xdoc.</param>


  18:         /// <returns>the xml document after conversion</returns>


  19:         public static XmlDocument AsXmlDocument(this XNode xdoc)


  20:         {


  21:             var doc = new XmlDocument();


  22:             doc.Load(xdoc.CreateReader());


  23:             return doc;


  24:         }


  25:         #endregion


  26:  


  27:         #region Xml To JSON


  28:         /// <summary>


  29:         /// Converts the XNode passed into JSON String


  30:         /// </summary>


  31:         /// <param name="doc">Xdocument to be converted</param>


  32:         /// <returns>JSON String</returns>


  33:         public static string AsJsonString(this XNode doc)


  34:         {


  35:             return JavaScriptConvert.SerializeXmlNode(doc.AsXmlDocument());


  36:         }


  37:  


  38:         /// <summary>


  39:         /// converts the XML passed into json string.


  40:         /// </summary>


  41:         /// <param name="xml">The XML.</param>


  42:         /// <returns>JSON String notation</returns>


  43:         public static string AsJsonString(this string xml)


  44:         {


  45:             return XDocument.Parse(xml).AsJsonString();


  46:         }


  47:  


  48:         /// <summary>


  49:         /// Opens the XML file mentioned in "fi" and return it as JSON String.


  50:         /// </summary>


  51:         /// <param name="fi"></param>


  52:         /// <returns></returns>


  53:         public static string GetJsonContent(this FileInfo fi)


  54:         {


  55:             if (File.Exists(fi.FullName))


  56:                 return XDocument.Load(fi.FullName).AsJsonString();


  57:             else


  58:             {


  59:                 return null;


  60:             }


  61:         }


  62:  


  63:         #endregion


  64:  


  65:         #region Json to XML


  66:         /// <summary>


  67:         /// Converts the json string into XML


  68:         /// </summary>


  69:         /// <param name="json">JSON as string</param>


  70:         /// <returns>JSON returned as XML</returns>


  71:         public static string AsXml(this string json)


  72:         {


  73:             return JavaScriptConvert.DeserializeXmlNode(json).InnerXml;


  74:         }


  75:         #endregion


  76:  


  77:         #region Object <-> JSON


  78:         public static string ToJSON<T>(this T obj)


  79:         {


  80:             return JavaScriptConvert.SerializeObject(obj);


  81:         }


  82:  


  83:         public static T FromJSON<T>(this string json)


  84:         {


  85:             return JavaScriptConvert.DeserializeObject<T>(json);


  86:         }


  87:         #endregion


  88:  


  89:         #region Dataset <--> JSON


  90:         public static string ToJSON(this DataSet ds)


  91:         {


  92:             return ds.GetXml().AsJsonString();


  93:         }


  94:  


  95:         public static DataSet ToDataset(this string jsonString, bool isXml)


  96:         {


  97:             var ds = new DataSet();


  98:             string asXml = string.Empty;


  99:             if (!isXml)


 100:                 asXml = jsonString.AsXml();


 101:             else


 102:             {


 103:                 asXml = jsonString;


 104:             }


 105:             using (var sr = new StringReader(asXml))


 106:             {


 107:                 ds.ReadXml(sr);


 108:             }


 109:             return ds;


 110:         }


 111:  


 112:         #endregion


 113:  


 114:         #region Others....


 115:         /// <summary>


 116:         /// Computes the size of the byte array in Megabytes


 117:         /// </summary>


 118:         /// <param name="array">byte array to be computed</param>


 119:         /// <returns>size of the array in MB</returns>


 120:         public static double SizeInMB(this byte[] array)


 121:         {


 122:             return array.Length / (1024 * 1024);


 123:         }


 124:  


 125:         /// <summary>


 126:         /// Converst the value into seconds. Basically it divides by 1000.


 127:         /// </summary>


 128:         /// <param name="val">Value in Milliseconds</param>


 129:         /// <returns>Value in seconds</returns>


 130:         public static double TimeInSeconds(this double val)


 131:         {


 132:             return val / (1000);


 133:         }


 134:  


 135:         #endregion


 136:     }


Test Data Helpers


In this set of helper classes, I wrote a couple of methods which wrap the most required functionality (at least for me) like generating a random string, getting a random integer, timing an execution. May or may not be useful to you all.


   1: /// <summary>


   2: /// Provides methods for timing execution of an action.


   3: /// Also provides method to generate a byte[] array with all random values.


   4: /// Other Random Helper methods.


   5: /// </summary>


   6: public class TestHelpers


   7: {


   8:     private static Random rand = new Random();


   9:     /// <summary>


  10:     /// This method executes the action passed and then returns the total time


  11:     /// taken in milliseconds using Stopwatch.


  12:     /// </summary>


  13:     /// <param name="action">the action to be performed</param>


  14:     /// <returns>time elapsed in milliseconds</returns>


  15:     public static double TimeAndExecute(Action action, int repeatCount)


  16:     {


  17:         if (repeatCount == 0) return 0;


  18:  


  19:         Stopwatch sw = Stopwatch.StartNew();


  20:         for (int i = 0; i < repeatCount; i++)


  21:             action();


  22:         sw.Stop();


  23:  


  24:         return sw.ElapsedMilliseconds / repeatCount;


  25:     }


  26:  


  27:     /// <summary>


  28:     /// Returns a random byte array of the specified size.


  29:     /// </summary>


  30:     /// <param name="size"></param>


  31:     /// <returns></returns>


  32:     public static byte[] GetBytes(int size)


  33:     {


  34:         var b = new byte[size];


  35:         var rand = new Random(size);


  36:         rand.NextBytes(b);


  37:         return b;


  38:     }


  39:  


  40:     public static int NextIntRand()


  41:     {


  42:         return rand.Next();


  43:     }


  44:  


  45:     /// <summary>


  46:     /// returns a randomly generated string.


  47:     /// </summary>


  48:     /// <param name="length">length of the string to be returned</param>


  49:     /// <returns>string generated</returns>


  50:     public static string GetRandomString(int length)


  51:     {


  52:         return Encoding.Default.GetString(GetBytes(length));


  53:     }


  54: }


Simplified Xml querying using Extension Methods.


The following method returns all the elements in the given document (XDocument) with the passed ElementName and which have the specified attribute name and value. I use it a lot for automating my XML documents manipulation.


   1: public static class XDocumentExtensionMethods


   2: {


   3:     public static IEnumerable<XElement> GetDescendantsWithCondition(this XDocument lgxDoc, string ElementName, string AttributeName, string AttributeValue)


   4:     {


   5:         return lgxDoc.Descendants(ElementName).Where(it =>


   6:         {


   7:             XAttribute attribute = it.Attribute(AttributeName);


   8:             return (attribute != null &&


   9:                     attribute.Value == AttributeValue);


  10:         });


  11:     }


  12:  


  13: }


Below are few more helper methods which I use regularly. One of them is the GetCopy() method which returns a copy of the passed XElement.


   1: class XDocumentHelpers{


   2: /// <summary>


   3: /// Modifies the element attribute.


   4: /// </summary>


   5: /// <param name="elementToModify">The element to modify.</param>


   6: /// <param name="attributeName">Name of the attribute.</param>


   7: /// <param name="attributeValue">The attribute value.</param>


   8: public static void ModifyElementAttribute(XElement elementToModify, string attributeName, string attributeValue)


   9: {


  10:     if (elementToModify == null || String.IsNullOrEmpty(attributeName)) Debug.WriteLine("Passed element is NULL");


  11:     else


  12:     {


  13:         XAttribute attribute = elementToModify.Attribute(attributeName);


  14:         if (attribute == null) elementToModify.SetAttributeValue(attributeName,attributeValue);


  15:         else


  16:         {


  17:             attribute.SetValue(attributeValue);


  18:         }


  19:     }


  20: }


  21:  


  22: /// <summary>


  23: /// Adds the element attribute.


  24: /// </summary>


  25: /// <param name="elementToModify">The element to modify.</param>


  26: /// <param name="attribute">The attribute.</param>


  27: /// <param name="attributeValue">The attribute value.</param>


  28: public static void AddElementAttribute(XElement elementToModify, string attribute, string attributeValue)


  29: {


  30:     if (elementToModify == null || String.IsNullOrEmpty(attribute)) Debug.WriteLine("Passed element is NULL");


  31:     else


  32:     {


  33:         if (elementToModify.Attribute(attribute) == null)


  34:         {


  35:             XAttribute xa = new XAttribute(attribute, attributeValue);


  36:             elementToModify.Add(xa); //add the attribute


  37:         }


  38:         else


  39:             ModifyElementAttribute(elementToModify, attribute, attributeValue);


  40:     }


  41: }


  42:  


  43: /// <summary>


  44: /// Deletes the element attribute.


  45: /// </summary>


  46: /// <param name="elementToModify">The element to modify.</param>


  47: /// <param name="attrToDelete">The attr to delete.</param>


  48: public static void DeleteElementAttribute(XElement elementToModify, string attrToDelete)


  49: {


  50:     if (elementToModify == null || String.IsNullOrEmpty(attrToDelete)) Debug.WriteLine("Passed element is NULL");


  51:     else


  52:     {


  53:         XAttribute attribute = elementToModify.Attribute(attrToDelete);


  54:         if (attribute == null) Debug.WriteLine("Could not find the attribute " + attrToDelete);


  55:         else attribute.Remove();


  56:     }


  57: }


  58:  


  59: public static void DeleteNode(XElement element)


  60: {


  61:     if (element == null) return;


  62:     element.Remove();


  63: }


  64:  


  65: public static XElement GetCopy(XElement mainTable)


  66: {


  67:     return XElement.Parse(mainTable.ToString());


  68: }


  69: }


I hope these utility methods provides good information about JSON, XML, XLinq, etc. Let me know if you have any comments to share.